Saturday, June 13, 2009

Homesteaders have Jammin' Good Times!

Harvest season is upon us. My sister, who just moved to northern Virginia from southern Pennsylvania, says they have a saying about corn: "knee high by the 4th of July." Our corn here in NW FL is grown, picked, and canned/frozen/eaten by the 4th of July. And by that time, our cornfields have already been plowed under.

I've been canning and making jam all week. I've included some pictures for you. I made a batch of spaghetti sauce this week. I picked up 40 lbs of tomatoes at a price I couldn't refuse.

Here is a site you might enjoy. You can see a step-by-step instruction of making sauce.

The website shows a process that is close to how I do it. Which is probably how everyone does. Our recipes are different but our process is the same. Especially the use of a pressure canner.
Did you know that tomatoes are the #1 most common home canned item in America? Probably because they can grow just about anywhere (even on a patio) and you don't have to use a pressure canner to preserve them.

You do not have to use a pressure canner for jams and jellies either. You don't have to use one for tomatoes if you aren't putting anything else (carrots, peppers, okra) in it.


But you MUST have a pressure canner for non-acid foods. It is the only known safe way to can low-acid foods. Yes, tomatoes are a high acid food, but today I'm making spaghetti sauce. I add other veggies in the spaghetti sauce (onions, peppers, carrots and maybe a zucchini). So we need the pressure canner.


To make my spaghetti sauce, I started off with 40 lbs of tomatoes. I bought them from a produce stand.


I clean them.


I chop them up and liquefy them with other vegetables and seasonings that I want in my spaghetti sauce. If, like me, you like wine in your spaghetti sauce, DO NOT add it here. Add it to your sauce when you prepare the sauce to serve over your pasta.


I cook the sauce until it is the thickness I prefer. See the rings? It was up to the top ring when I started. Yes, It took a couple of hours to cook down this far. But it's worth it.


I fill the jars leaving 1/4" head space. Head space is important! Too little and the jar could burst as the contents expand. Too much and the jar won't seal properly. There are many sites showing head space requirements. Check with your county extension office


Or buy a copy of the canner's "bible" the BALL BLUE BOOK: Guide To Home Canning, Freezing & Dehydration.


It is an invaluable tool to the home canner.


Here is my spaghetti sauce: cooked,
jarred, processed, and ready for use.


Here are some of the jars of peach jam and blueberry jam that I made. Y-U-M.


The peaches we bought were not good for eating. They were too sour even though they were ripe. But they made magnificent jam!

Go ahead!! Try your hand at making jam. It's fun! And economical!!!

In the next few weeks, I'll use the pressure canner to can dozens of jars of green beans, potatoes, gumbo mix, corn, and whatever else I have grown or can pick from a U-Pick farm for a very cheap price. I won't bore you with the process again. But I might show you the pictures of the finished product.

Comments are welcome!

More later....


Wednesday, June 10, 2009

Homesteading: Planning for the future

Remember the fable of the ant and the grasshopper? The ant was busy storing food for the winter while the grasshopper fiddled. Then when winter came, the ant had food and the grasshopper didn't. Well, I've been busy as an ant today.

The potatoes are ready to be harvested. Potatoes grow underground so you have to dig them up. You know it's time to dig them up when the above-ground part starts to look dead. When I was a kid, Mom used to give us a big spoon and send us out to the garden to dig for potatoes. What kid doesn't love digging in the dirt! It kept us happily occupied and saved her from a chore.

We use a fork to dig potatoes. A manure fork. A clean manure fork used only for the potatoes. We got about 20 pounds this time. Add that to the 10 lbs I got last week and we have already harvested about $12 worth of potatoes. In addition, I have harvested about $5 worth of beans and $3.00 of peppers. So I'm almost at the break-even point on my investment. I still have 2/3 of the potatoes left to harvest. The corn will be ready in about 3 weeks and the okra in about 3 weeks.


Here are the potatoes we dug up today.
They are red potatoes. My favorite.


I have already frozen about 10 lbs. I canned about 12 lbs. I saved the rest to eat.


To can potatoes, You need a pressure canner. Pressure canning is the only safe way to can non-acid vegetables.


I first gather all my materials.
Here are the jars, rings, and lids.

You can re-use the rings every year or until they get rusty.

You can re-use jars as long as they do not
get chipped, cracked or broken.

You absolutely cannot re-use lids.


I had to clean the jars then boil them for 10 minutes.


Home canning is wonderful but a lot of work. Everything must be sterile. Botulism is real and deadly. Some people think that just washing the jars and rings in the dishwasher is enough. Maybe they are right. But I take no chances. I wash them in the dishwasher first then bring them to 212 degrees (boiling) for 10 minutes.


I had to wash, peel and cut-up about 12 lbs of potatoes!


Then I put them into the jars, put them into the canner and processed them at 11 lbs. pressure for 35 minutes. I used large-mouth pint jars. If I had used quart jars, I would have had to process them for 45 minutes.
Here is my pressure canner. It has reached 11 lbs. of pressure. It holds 7 quart jars or 9 regular pint jars or 8 large-mouth jars. For potatoes, squash and green beans, I use large-mouthed jars. It's hard to pour large veggies out of small-mouthed jars.


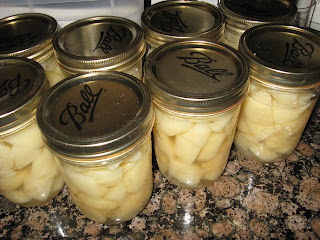
Here is the finished product.


It's a lot of work for just 8 pints of potatoes. But the first batch is the most work. After that, you already have the materials assembled so the subsequent batches are easier. A lot of work, but I know what's going into my food.

Canned potatoes are great in stews or casseroles. Here is a good recipe for a potato casserole.

Ingredients
2 pounds potatoes, sliced thin
1 large onion, sliced into rings
1 quart buttermilk
3 tablespoons *kosher salt (more or less to taste)
3 tablespoons freshly ground black pepper
1 (16 ounce) package sharp Cheddar cheese, shredded
DIRECTIONS
Preheat oven to 350 degrees F (175 degrees C). Grease a 9x12 inch glass or ceramic dish with olive oil.
Layer 1/3 of the potatoes on the bottom of the dish. Then 1/3 of the onions. Pour 1/3 of the buttermilk over the potatoes and sprinkle with 1/3 of the salt, pepper and cheese. Repeat 2 more times, ending with cheese on top.
Bake in preheated oven for 30 to 35 minutes, or until hot, bubbly and golden brown.
*FOOTNOTES
This recipe calls for kosher salt, not table salt. If you would like to substitute table salt, you will need only a fraction of the salt called for; season to taste.
Using a food processor to slice the potatoes will make it easier to achieve very thin slices. Remember, thicker slices will take longer to cook

Enjoy. More later....